
As many of you might know, I have recently bid farewell to my trusty Mares Hybrid MRS+ BCD to start a venture into the more technical side of diving, starting with a combination of some new certifications as well as the appropriate gear. But appropriate gear is such a wide term. What constitutes “appropriate”? A decent diver would be able to make do with most recreational jacket BCD’s, whereas the very best Hollis tec wing on the market would not be able to save an incompetent diver any more than an entry level BCD would. So let me rephrase my previous statement: Expandable, modular gear. Where ye olde BCD might still sometimes include the required mounts to fit a set of twins, it will no doubt become a little chunky when trying to sling a stage tank on either side along with twins on the back. Most recreational BCD’s comprise of a series of (mostly plastic) clips and snaps which creak and croak under the weight of slightly heavier setup containing hefty cylinder AND integrated weights. Take my Hybrid for example: The Hybrid is Mares’ flagship BCD featured on every pamphlet, website and sticker, and granted it’s a fabulous, lightweight, super comfortable recreational BCD. I might even go so far as to say that if you intend on staying above 30m, you don’t get much better than the Hybrid. But when loaded with my 12L, 3kg tank weights and 5kg integrated weights, I can’t help but squint my eyes in anticipation of one of the plastic clasps giving way when I don it. Now imagine if I had to fit it with twins…
The term “Doing It Right” (DIR for short) refers to a approach to diving formulated in the mid 90’s during the Woodville Karst Plain Project when a research & exploration group set out on a mission to map the underwater cave system underlying the Woodville Karst Plain in Tallahassee, Florida and were looking for ways to minimize fatalities during cave dives. It’s not just a gear setup, but rather a “way of diving” which encompasses everything from diving practices, physical fitness and a minimalistic approach to the gear required to complete the dive safely including a standardized configuration of said gear. This particular setup has come to been known as the “Hogarthian-setup”, named after William Hogarth Main who is largely responsible for the setup as we know it today, formulated over time by trial and error. Some elements of the layout were adopted from the gear of Main’s dive partner Sheck Exley who is widely regarded as one of the pioneers of cave diving and the gear we still use today to venture into the unknown.


The base of the Hogarthian setup is a backplate and wing, which comprises of a strategically curved solid stainless steel plate with multiple holes and slots for different configurations, a harness made of two pieces of 50mm webbing (one 5m piece making up the entire upper webbing and waistband and another to form the crotch strap), and a “wing” which refers to the back mounted inflatable bladder being either horseshoe (twin cylinders) or donut (single cylinder) in shape. This basic setup might not always look as appealing nor be as comfortable as conventional BCD’s, but their design is desirable in that they have very few, if any, potential points of failure. The single piece webbing is configured initially to fit the diver for which it is intended, after which excess webbing is cut off to minimize overlap and thereby also the chances of snagging. It contains no clips other than the waist buckle and typically has two D-rings on the shoulders, one on each side of the waist and two on the crotch strap to attach to a DPV where applicable.

The cylinder is attached to the setup in one of two ways, depending on the configuration. When diving a single cylinder, the correct way to mount the cylinder is with the use of a STA (single tank adapter) which is an additional angled piece of stainless steel which bolts through the wing and onto the backplate. The cylinder is then secured using two tank straps passing through the STA. Although this is the correct method, dives only requiring a single tank usually do not have a very technical aspect and divers often opt to leave the STA altogether and just pass the tank bands through the backplate and wing and around the cylinder, thus using the cylinder to hold everything in place. Although this works, should the tanks bands loosen for any reason during the dive, the wing will also loosen and can in extreme circumstances separate completely from the backplate, leading to an unwanted shift in buoyancy to say the least. Best stick to the STA the way it’s intended.
Since most divers making use of a backplate and wing will however be doing technical dives, the likelihood is that they’ll always be using twins. In this case, the cylinders are held together by means of two stainless steel tank bands with 15cm bolts running through the centre. These bolts are 22cm apart and line up to holes in the backplate and are mounted as such, though the wing and onto the backplate. With no conventional straps holding them down, everything is bolted together and thus creates one less possible point of failure.
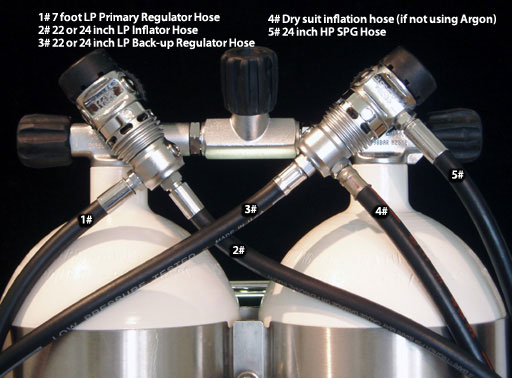
Next up is the hose configuration. Twin tanks are connected by the valve using an isolation manifold. This allows air to be used from both tanks from either of the respective valves, as well as cutting off air from a single valve in the event of valve malfunction. Connected to these respective valves are two sets of regulators. When viewing the diver from the back (or from the diver’s perspective), the right side valve will contain a first stage and the primary regulator as well as the primary inflator hose. The primary regulator is on a 210cm hose routed down, around the canister/tucked into the right side waistband, upwards across the chest to the left shoulder, around the back of the neck and back into the diver’s mouth from the right. We’ll get to the reason for this later. The standard length primary inflator hose is routed down and to the left where it meets the power inflator and passed over the left shoulder. The left side valve will contain a separate first stage with the secondary regulator on a normal 65cm hose as well as a 50mm round SPG on a standard length HP hose. The secondary regulator is routed down and to the right, passing over the left shoulder and hanging from a bungee around the diver’s neck, whereas the SPG is routed straight down, around the left side of the wing and clips to the left side waist D-ring. Some divers opt to have separate SPG’s on each first stage, in which case the right side SPG will be routed the same. In the case diving with a drysuit, the left side first stage wil contain an additional inflator hose and when using a dual bladder wing, a third might be added which will be routed down and to the right. It will however not be connected to avoid confusion underwater. This is only used as a redundant solution when the primary bladder (left side power inflator) fails in which case the left side will be disconnected and the right side connected. Any stage tanks will be slung from the shoulder and waist d-rings.

This is the basic Hogarthian setup. Since all hoses are routed down before leading to whatever side they need to go, the isolation valve is unobstructed and can be easily identified and reached. Unlike conventional emergency procedures taught during Open Water certifications, the secondary regulator is not provided to the diver in need. In an emergency situation, the primary regulator attached to the 2m hose is supplied. By simply nodding ones head forward, the slack is released from behind the head and the entire 2m hose will be available. From here the secondary is simply scooped up from where it hangs underneath the diver’s chin. The reason for this is maneuverability. Technical dives often include overhead environments and cramped spaces where divers are unable to pass through alongside each other. The long hose allows divers to swim behind each other thus sharing gas while still being able to navigate out of their immediate area with relative ease. In the event of a primary regulator failure, the left valve and isolation valve are closed and the diver switches to the secondary regulator from which he can still use the remainder of the gas in the right tank to surface, and vice versa. This provides a level of redundancy that, together with the overall minimalistic, trimmed down and compact layout of the Hogarthian setup makes for much lower risk technical diving.